RSS
Facebook
Twitter

Saturday, 15 September 2012

This tutorail is for making a Bootable USB Flash Drive or Memory Card that can be used to install Windows XP on Netbooks that do not have optical drives. To complete this tutorial you need a PC with a version of Windows XP / Vista / 7, and a USB Flash Drive or Memory Card that is at least 1GB in size or more.

Download you will need:
flash-drive-prep.zip
Extract the files in ‘flash-drive-prep.zip’.
You will get two folders, ‘bootsect’ and ‘usb_prep8′.
Inside of the USB_prep8 folder double click the executable named ‘usb_prep8.cmd‘ You will get a window that looks like this
usb_prep8
Press a key and you will get another window, as shown below
usb_pre8_2
These settings are preconfigured for you all you need to do now is click start. Please ensure that you select the correct flash drive or Memory Card drive.
Once the format is complete DO NOT close the window just leave everything as it is and open a command prompt from your start menu (type ‘cmd‘ in the search bar or run box depending on your version of windows.).
Inside of the command windows go to the bootsect directory, extracted from the above downloaded zip file. In that folder, you should find 2 files, ‘bootsect.exe’ and ‘bootmgr’.
(use the ‘cd <directoryname>’ command to switch folders and ‘dir’ command to list contents of a directory you are in.)
Now type ‘bootsect.exe /nt52 X:‘ NOTE ‘X:‘ is the drive letter for the USB Flash Drive or Memory Card that you just formatted. Please change this value accordingly. What this does is write the correct boot sector to your USB Flash Drive or Memory Card, this allows your PC to boot from the USB Flash Drive or Memory Card. Without it nothing works.
Please note: When running the bootsect.exe command you cannot have any windows open displaying the content of your USB Flash Drive or Memory Card. If you have a window open bootsect.exe will be unable to lock the drive and write the bootsector correctly.
If all went well you should see "Bootcode was successfully updated on all targeted volumes." Now, close this command prompt (don’t close the usbprep8 one by mistake) and the petousb window.
Your usbprep8 windows should now look like this. If it does not, try pressing enter.
usb_prep_3
Now you need to enter the correct information for numbers 1-3.
Press 1 and then enter. A folder browse window will open for you to browse to the location of you XP setup files. This could be your physical or virtual cdrom drive with xp cd or image inside it, or a folder in the computer with the XP setup files.
Please note that for the Compaq Mini 110, you will need to slipstream Intel SATA Drivers into your XP install CD or ISO otherwise, you will get a BSD (blue screen of death) as you try to boot from the USB Flash Drive/Memory Card or you will not be able to see a your hard disk in the XP setup. Click here to view a tutorial on how to slip stream the Intel SATA Drivers into you Windows XP Install CD or Image (iso).
Press 2 and enter a letter not currently assigned to a drive on your PC. Warning: If you select a drive letter that is assigned to a device on your PC, this device will be formated and you will lose all your data on that drive. The system will not work if you select a network drive.
Press 3 and enter the drive letter of your USB stick
Press 4 to start the process.
The script will ask you if its ok to format the drive whose letter you selected in 2 above. This is just a temp drive the program creates to cache the windows installation files. Press Y then enter.
Once it’s done formating press enter to continue again, you can now see the program copying files to the temp drive it created. Once this is done press enter to continue again.
Next you will see a box pop up asking you to copy the files to USB drive yes/no you want to click yes.
Once the script has completed copy files a popup window asking if you would like to USB drive to be preferred boot drive. Select YES on this window.
Now select yes to unmount the virtual drive.
And we are done. You now have a USB Flash Drive or Memory Card that is bootable and can be used to install windows XP on a variety of computers.
END

Friday, 7 September 2012

AN EASY WAY TO HIDE UR FILES WITH IN IMAGE

Hai guyz i proud my self to post another post for today.........
thanks for visiting my blog .......
keeps visiting my blog...........


To hide a file in image please follow the instructions care fully..

REQUIREMENTS

1. DOS COMMAND
 
     To open dos command click start button and in run type  cmd...
     then press then dos command will appear

2. WINRAR

     Hey guyz.. i think all u may know about the use of winrar...

3. AN IMAGE FILE........

     This file is used to hide ur files.....

STEPS TO BE FOLLOWED

1. Compress all ur files u want to hide in picture using winrar....
2. Copy the winrar file and and an image file to a temporary file.
     for example : D:\kk
3. Then by using cmd open the directory
  
      then it appear as D:\kk>
4.Then in cmd "copy /b lady-gaga.jpeg + my-files.rar output.jpeg" without quotes, and press enter
5. It will create a output.jpg in the directory kk
6.Now if u open ur output file it shows ur image file 


Thursday, 6 September 2012

watch online TV


If you are never experienced Mobile TV on your smart phone yet, here is a chance to enjoy 20 TV channels on the move. It is offered by Ditto TV that delivers Live TV, Video-on-Demand, Music, News and much more on your mobile phones, tablet, desktops, laptops and other hand held devices.


 Ditto TV is another platform first from Zee Entertainment Enterprises Limited (ZEE), one of India's leading television, media and entertainment companies.   Ditto TV offers you a Quality Video Viewing that is adapted especially to suit range of internet speed. This means that you can watch Ditto TV using 3G, Wi-Fi and broadband.


The free trial will allow you to watch all offered Live channels for 10 minutes in total, after that you may fully register with DittoTV and will receive another 48 hours of ETC and Zee news for free! Later on, you are able to watch ETC for 5 minutes a day without any costs. Currently, the DittoTV service is only available in India..


DittoTV is available on Android smartphones and tablets (Android v2.2 and v2.3), on all iOS devices (iOS 4.x and 5), on Blackberry devices and on PC and Mac desktop computers. If your internet connection is faster then 100kbit/s then you are ready to go! For an optimum viewing experience 3G mobile access or fixed line capacity will be needed. If your Internet speed is below this, DittoTV will still work but quality may be reduced.The DittoTV app for Android and Mac/PC requires Adobe Air to be installed on the device. 
To Download Ditto TV, Click here
To Know more about how Ditto TV works on your device, Click here

Wednesday, 5 September 2012

google often surprises us with their search tricks. In this post we are going to give you the list of some funny search tricks.

1) Do a barrel roll: Go to Google.com and type Do a barrel roll and enjoy a barrel roll.

2) Zerg rush: Go to Google.com and type Zerg rush. Wait for 10 seconds and enjoy the trick

3) Google Gravity trick: Go to Google.com and type Google gravity trick, click the first result or go to this link. You can move all the parts of Google search bar. Just play with it the way you like.


4)  Google's Les paul Guitar: Google introduced an awesome online guitar in the 96th Birthday of Les paul. This was a huge hit in the internet. You can play the guitar with your mouse cursor or keypad. You can also record it as well. To play the guitar please go to this link

5) Askew: Go to Google.com and type Askew. Looks awkward right?

In this post we will teach you a very funny computer prank by which you can give your friend a mini heart attack. 
The infamous "blue screen of death" is very notorious because it gives you the message that your Computer system file has been damaged and almost irrecoverable. Nobody likes to see the Blue screen of Death message in their computer. Just follow the procedure below to do the Screen saver Prank

Step number 1: Download/save the Screen shot of the (blue screen of death) picture below :

Step number 2: Set the picture as screen saver of your friend Computer. How to set the picture as screen saver? First go to my Documents, then My picture , paste the Picture in the my Picture folder and move other picture if there is any. Then go to your desktop , right click , click properties, click Screen saver and Choose "my picture slideshow" from the option. Set the waiting time to 1 minutes only. Then click setting and choose 100% screen option. Then click apply and Ok. 

This is a good prank to make fun with your friends. Hope you have enjoyed the prank. For more pranks and tips please subscribe your Email (look at the top right side) in the subscription Box to get notification about the new post.
In this video I am going to show how to make funny music By using Google translator

Just found a new way to have some fun by using Google translator prank. Do you know that you can make music by using Google Translator? Does it Sound interesting to you? If yes then keep reading , If no then also keep reading. 
How to do this prank: 

1) Go to Google translator: Go to Google translator and choose CZECH in the from option , the same way you can see in the picture below: 
2. Type: In the box make stupid sentences mainly using the word "K" "L" "T" "M" etc. I just have found that you create some interesting music beat by using this alphabets. Copy and paste the following sentence to see how it works (without quotation) ,
" kkkkkkklllltttttktktktktktktktktmnmnbvbvbvbvbvbvbvbv"

3. Click listen: Now simply click the listen button as you can see in the picture below and enjoy the peculiar sound (so called my music). 
Now you can try making your own music by using different combination of alphabets. You can use any alphabet you want. All you have to do is to make something awesome. Share it with your friends and have fun. 
Hope this simple trick would make you feel better. Submit your email at the subscription box (top right bar) to get new tricks update via Email. Thanks for visiting Alltricks
A cool website to make colorful silk design and graphic texIn this Blog I am going to introduce you with a cool website where you will be able to make colorful wave silk design just by moving your mouse pointer. You can also write your name with that super cool wave silk design.

Below you can see a picture : 


Wanna check the site? 

To check the site go to this link - Weave Silk

At first  learn about some basic shortcut key . Click and drag your mouse pointer to draw whatever you want. The silk weave will flow to make beautiful design.

Some of the shortcut keys are:  

X = Press X to create a new design by removing the old one. 

S = Press S to stop the flow of the silk. This is very important key. When you draw anything it the wind will blow the color trend. You must press "s" before the color trend goes too far away. 

Shift+Move mouse pointer = when you draw anything the wind blows to the right and the color trend also goes on that Direction. Press shift and then move your mouse pointer to change the wind direction

Below you can see a picture where I have written "Pctric" :

its.........cool dude.........?

Tuesday, 4 September 2012


In this Blog I am going to discuss about "making a new blogger blog". I am not a professional blogger but I do have some experience with blogger blogging platform. Professional bloggers prefers a self hosted WordPress blog with a premium Custom domain. For a beginner blogger this is not recommended as you have to pay monthly for hosting, and annually for domains. A domain does not cost much because it requires only a small amount of money annually. But hosting does costs a lot because you have to pay monthly.

This Blog is specially for beginner bloggers.So I will recommend a new blogger to start with blogger.com free blogging platform. You can also open a free blog at Wordpress.com but you can not use adsense for a free wordpress blog. You can use adsense in self hosted wordpress blog (wordpress.org). That means wordpress.org is for professional blogger and wordpress.com is for amateur blogger. So if you have any intention to make money, You have to choose between a free blogger blog or a self hosted Wordpress blog. Obviously for a beginner Blogger free blog will be comfortable.
-----------------------------------------------------------------------------------------------------------------------------------
Steps to Make a decent Blogger Blog:
To open a free blog just go to Blogger.com and sign up within a second. Now you have to choose a good layout. Layout is very important because it helps in getting good impression. The blogger templates are good but does not look so professional. So I will recommend to Download Custom template. You can choose custom template from anywhere else. Try to choose a template which does not takes time to Load and you can focus on your contents.
All the important step to make your blog professional are described below. Don't forget to Sign up first to open a blog in blogger.com
Step 1) install a Custom professional Template: Login to your blogger account. Click "Design" then click "Edit Html" . This is the place where you can edit your blog templates or upload a new template. To upload: just Choose the "template file" you downloaded , then upload it. After uploading it click "View blog" to see the look of your blog. If you like the template keep it or if you don't like then upload a new one. You will need to do additional custom work to make it looks like your blog.

Step 2) Configure Header: Your Blog Title and the header image is the first thing which will attract the visitors. So give a suitable Blog title and Upload an Image. Try to edit the Image before uploading so that it can be fit exactly. If you want you can also write a description.

Step 3) Meta Tag : Meta Tag is very important for optimizing your blog in search engines. It helps the search engine to find your Blog description , Titles and keywords. To add meta tag to your Blog Log In to your account --> Design--> Edit HTML-->
Now in the HTML code find this code (use CTRL+F5 to find code) - <head> . Then right after it paste the followinbg Meta tags.

<meta name="title" content="YOUR BLOG TITLE HERE" />
<meta name="description" content="YOUR BLOG DESCRIPTION HERE" />
<meta name="keywords" content="YOUR BLOG KEYWORDS HERE" />
<meta name="author" content="NAME OF AUTHOR HERE" />

(In the "Your blog Title" give your desired blog Title , same in the description put the description of your blog etc)


4) Buy a custom domain: It is better to buy a custom domain from the beginning. What you are using currently is a blogger sub domain. Buying a premium domain will attract visitors because the domain name will be shorter which visitors can memorize easily. Moreover many affiliate program & premium advertising site prefers a blog with Custom domain. It will also help you to rank well in search engine.


To buy a Custom domain Log In to your account -->Setting-->Publishing-->Switch to Custom domain.
Find a suitable short domain name for your site. Make sure the name is unique and it matches with your Blog niche. Check the availability and buy .com domain. You can also buy .net or .org etc. Don't worry about the Price. You can buy a .com domain with only 10 dollars. If you buy it from blogger.com you will also get Google's apps for free as a gift. If you want you can buy Domain from Godaddy.com as well.

5) Add a Custom Favicon: What is a Favicon? Favicon is the unique Icon by which user can easily identify the site without the title or description. For example , you can see the favicon of my Blog at the top of your Web browser tab (The letter M ). When you will sign up with blogger , your Favicon will be default Blogger favicon. So, you will need to set up a custom Favicon to make your blog completely unique and nobody will understand that you are using a blogger blog (except the professional bloggers/webmasters).


* How to setup your custom favicon to your blog:
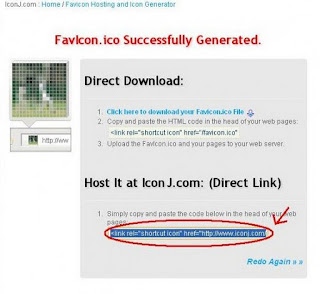
I am going to tell you the most easiest and the best way to add a custom favicon. Just go to this link ICONJ and upload the image (which will be your Favicon) . You can see the up loader at the top right corner of the site. The site is really awesome because it will do 2 things for you at the same time. It will convert your Image to .Ico extension and also upload the image to their site (free hosting). After uploading the picture copy the link as you can see in the picture.

After copying the picture then Log In to your account --> Design--> Edit HTML-->Click expand html.
Now find the "<body>" tag by using CTRL+F5 from your blog HTML codes. Then just below the <Body> Tag paste the link you have Copied from ICONj. Save the changes and look your blog.
This is the easiest way to change Favicon you will find in internet.

--------------------------------------------------------------------------------------------------------------------------------------------------------------------
I guess this is enough for a beginner level Blogger. Now you can include different types of gadget for making your blogger more beautiful. But do not use unnecessary widget which will make your blog peculiar. Now you have your own custom domain name, Your own custom Layout , Custom Favicon for your blog, Meta tag etc etc.Thanks for visiting this Blog. Cheers!!


Hey there welcome to Pctrick.com! Recently I have noticed that many auto bloggers are copying my Blog contents without any permission. Some of the articles in their Blogs are ranking higher than mine although I am the original author. So I have decided to stop this copy pasting fraud. I have found many solutions, but in this Blog I will give you the easiest and most effective solution.


There are many articles you will find where you are advised to paste a long HTM/javascript code to prevent people from using the right click. This surely an effective method to prevent people from plagiarism. However I did not like the method because this could cause problem to the normal Bloggers. The normal readers might need to copy one or 2 words for normal purposes. Moreover for simple blogger it become a difficult job to integrate long HTML/JavaScript codes.


What is the best solution then?


Embedanything.com is the best solution for preventing plagiarism activity within a second. Just go to Embedanything.com and sign up easily for free. Then set your Blog URL and and click Article Option, you will find a simple short Java script code. Just copy the simple code and paste it anywhere between the <body> tags. Now if anyone try to copy more than 10 words a pop message will appear to stop people from copying your contents.


Other features:
1) You can also protect your images by using the site integration.
2) You can set word limits to copy.
3) You can also use settings for protecting your images
4) You can show your ads with your article embeds


I really love the site! I hope you will enjoy the free service too.
   
International calls were very expensive. But with the introduction of VOIP (Voice over internet protocol), international calling has become cheaper. But now people are looking for a complete free way to make international calls. Is it possible?

Yes it is possible! With the advancement of technology and smartphone , now you can make free international calls all the time.

How to make free international calls: You might find few apps which offering few free international calls and then charging after that. But with the Viber application you can make international callas and send message for free. Viber is an free app available for Iphone, Andorid, Blackberry and Windows mobile user . This app allows you to call anywhere in the world.


The requirements to use Viber are given below:

1) This app is only available for Iphone, Android, Blackberry or Windows mobile users. So, you must have any of these smart phones.

2) The person you are going to call also need to have this app on his/her smart phones.

3) Wifi or 3G internet connections are required to run this app.


Advantages of Viber:


1) Viber is free
2) Send free message
3) Do free calls
4) It also support video call


Trick To Make Your Firefox Fast

This Firefox tricks will improve the speed & load time of firefox. And you will be able to surf faster.
  Type  about:config in the address bar, Then look for the following entries, and make the corresponding changes.
network.http.max-connections-per-server =32
network.http.max-persistent-connections-per-proxy =16
network.http.max-connections = 64
network.http.max-persistent-connections-per-server = 10
network.http.pipelining = true
network.http.pipelining.maxrequests = 200
network.http.request.max-start-delay = 0
network.http.proxy.pipelining = true
network.http.proxy.version = 1.0


Lastly right-click anywhere and select New- Integer. Name it nglayout.initialpaint.delay and set its value to 0. This value is the amount of time the browser waits before it acts on information it receives. Enjoy!

Interesting new technology

Interesting new technology: write a message by using your eye only

A research institute of France has discovered a technology to write sentence by using the movement of human eye. The machine will read the movement of human eye and transform into digital alphabets. But the technology is not perfect yet. Much improvement is required to make the best of it. In a trial few people volunteered to see how the machine works. It took half an hour to deliver 20 alphabets.


Photo By _StaR_DusT_


You might be wondering what is the use of it? We can already write or type by our hand. Then why scientist are discovering a machine to write by using our eyes?

The machine will be used mainly for paralytics patients. Most of the paralytics patients are able to move their eyes. This machine might help the paralytics patient to contact with their families and doctors.

Check out the video below:

FB tips and tricks - blue text links & tag people from mobile tricks

Share

Do you like this story?


We already shared many cool Facebook tricks. In this Blog we will share some more Facebook tips and tricks!


1) How to post blue text link as your Facebook Status: Have you noticed how people are posting blue text links? Those Text are clickable but when you click them, you are being redirected to your own profile page. Now we are gonna tell you how to do that.

You just need to type your Facebook status inside a simple code to make it Blue Text Link. For the above Facebook Status, I have used the following code ,

@@[1:[0:1:Boring boring!!]]
Just copy the code and paste to your Facebook status bar to see the changes. Now you can simply change the text to make your own status.


@@[1:[0:1:Write your text here!!]]

2) How to tag people/fan page from mobile browser: It is really easy to tag people/fan-page by using a PC browser. But it is not easy to tag people/ fan page by using an ordinary cell phone browser. It might be difficult but not impossible. You can tag a specific people or fan page by using a simple code.

To tag a person just simply use this code - @[id no:]

For example, If your profile ID is 201010101001, I need to type this code @[ 201010101001 :] in my status bar to tag your profile.

How to find the ID: To find the ID of a person/page, click the profile link of the person or page. Then click message option. Then check the address bar, in the address bar you will find the id at the middle of the URL.

3) Give a status with uʍop ǝpısdn (upside down) Letters : Screw your friends by posting a funny short status with upside downAlphabets. You can simply Flip any sentence using the Flip Text Generator - Just go to this link and Flip the Text.

Microsoft researchers have been developing a system called SoundWave that emits pulses in ultrasound ranges and detects Doppler-based changes to track human movements. Its creators hope their accidental discovery could improve gesture-based controls.


Microsoft Research


Gesture-based controls have become so widespread they seem almost mundane. We casually flip through photos on our smartphones and have no problem swinging our arms back and forth in front of an Xbox Kinect. However, both touchscreens and camera-based recognition systems require specialty hardware. At Microsoft, researchers have created a program called SoundWave that needs only a speaker and a microphone.

Sound might seem like an unusual choice for gesture recognition—after all, moving hands need not make any noise. But SoundWave isn’t trying to detect the sound of your hands. Instead, the speaker plays an ultrasonic tone, one that is high-pitched enough to be inaudible to the user. The microphone then detects changes in the ultrasound and interprets those changes as movement.

Sidhant Gupta, a graduate student at the University of Washington, stumbled upon the idea while working on a different project. While measuring the frequency of a 40-kHz ultrasound wave, he noticed that the computer’s microphone was behaving oddly, picking up rogue signals at 39 and 41 kHz. "I thought it was a loose wire and that I should fix it."

Even after double-checking that all connections were secure, the abnormal signal persisted. He then realized that it wasn’t an equipment malfunction. The phantom ultrasound waves were the result of his leg idly bouncing up and down in his seat, produced by something out of high school physics: the Doppler effect. Think of an ambulance siren as it zooms down the street. The change in pitch that you hear is determined by the Doppler Shift formula. If the sound source is zooming toward you, you get more sound waves, resulting in a higher frequency and a higher-pitched siren. If it’s speeding away, the opposite happens.

When Gupta sits still, the sound waves bounce off his leg and back into the computer microphone, registering as 40 kHz. However, when he starts to fidget, the bounced sound waves appear to be moving toward and away from the microphone. The restless leg produces a small, but measurable, change in frequency. Based on the pattern of these changes, he wrote a program that recognized whether his leg was moving up or down and expanded it to detect other types of movement and gestures. 


Though using the Doppler effect to track human gestures has been around for a decade, it had always required customized equipment. SoundWave eliminates the need for any specialized hardware, requiring only basic technology. Computers, cell phones, and other electronics already come equipped with a speaker and microphone.

Microsoft is not looking to revolutionize motion control with ultrasound. Dan Morris, another researcher involved with SoundWave, envisions the program more as a supporting actor than a one-man show. SoundWave wouldn’t replace Kinect, but it could work beside it and make it better by making gesture recognition more accurate in more directions. "Computer vision isn’t perfect, so anything you can do to provide more information will make [gesture recognition] more accurate."

If there’s one worry about SoundWave, it is that the technology relies on the limited hearing range of adults for the ultrasound pulses to go undetected; but not everyone’s hearing is so diminished. For instance, products like the Mosquito antiloitering device play similar tones to specifically target and irritate the more sensitive ears of teenagers, and Bhiksha Raj, a computer science professor at Carnegie Mellon University, worries about the side effects of SoundWave on young children and pets. "Don’t get me wrong, the premise is brilliant," he says, "but you know what happens when you hear a high-pitched tone. They have to take care of these issues first."

Morris says the team is aware of that concern, and early in the project’s development they tested SoundWave in crowded environments where both dogs and kids abound, and never received any complaints. "We tested it with a 4-kHz tone and it was about as loud as the sound effects that normally come out of a laptop."


Does When u Double click on Drive... New Window opens?

Whenever ppl double-click on any folder in Computer,
it opens in a new window even if selected the option “Always open folders in same window” in “Tools -> Folder Options”.
For this kind of Problem
Download following zip file, extract it and then run .REG file and confirm the action:
Download

Tips to recover scratched CD's

Tips to recover scratched CD's

1. Spread a cloth on a flat surface and place the CD on it.
2. Then, hold the disc with one hand, use the other to wipe the polish into the affected area with a soft cloth.
3. Wait for it to dry and buff using short, brisk strokes along the scratch, not across it.
4. A cloth sold to wipe spectacles or camera lenses will work super m8's.
5. When you can no longersee the scratch,, wash the disc with water and let it dry before playing. Intersting isnt it? Try it right now
I have used toothpaste with good effects before Ive also used car paint cutting compound on deeper scratches. It does leave lots of smaller scratches (as it is a cutting compound after all) but it will remove the worst scratches in most cases.
ya u r gng to b surely befinited by this Operation

* Fingermarks/prints cause 43% of disc problems!
* General wear & tear causes 25% of disc problems!
* Player-related issues cause 15% of disc problems!
* Remaining Others

No Need to Sign Up For To Download any file from any website.


No Need to Sign Up For To Download any file from any website. Many times we see that when we want to download a small file or large file of few GB or some data . The website asks for us to register free and download. And we have to make your email confirmation and all that. This all process takes time.

So Regarding this problem i seen one solution of this problem. Its solution is Bugmenot.

No Need to Sign Up For To Download any file from any website.Its a website www.bugmenot.com . In which you get almost all Downloading websites user name and password Free.

Its a website www.bugmenot.com . In which you get almost all Downloading websites user name and password Free.

So just Search your website and use it and make your download fast and Sign Up Free.

How to secure your login from hackers?


How to secure your login from hackers?


How to secure your login from hackers? As we see many times hacker hack your online bank account or any other account like Facebook, Twitter, Gmail or it can be any thing and misuse our account. Before knowing how to secure the account, we need to understand that how the hackers hack your account? There are many ways to hack an account but most common way is keylogger.


As we see many times hacker hack your online bank account or any other account like Facebook, Twitter, Gmail or it can be any thing and misuse our account.

Before knowing how to secure the account, we need to understand that how the hackers hack your account?

There are many ways to hack an account but most common way is keylogger.

What is keylogger and how it works for hacking?


Keylogger is software by which anybody knows what we are typing on any website.If anybody knows what we are typing on any website then he also knows that the typed username and password that we type for our bank account or any account like Facebook, Twitter, Gmail or it can be any thing.


So, the whole matter is that, how can we secure our login from keylogger?

The most secure and important way is that, when you login your bank account or any account, then you must preferred “your” computer only.

But it is not always possible, sometimes we need to login with your friends computer or from cyber cafe.
In this case, never type your username and password from keyboard, then what will you use? 

You can use virtual keyboard instead of real keyboard, you must use virtual keyboard.

In many bank website the virtual keyboard is given.
If it is not given, then just go to start >run> and type “osk” and hit enter.
Your virtual keyboard is on your screen.

So, always login with Virtual Keyboard and one more thing if you are using Internet Explorer or Mozilla Firefox then, you can use its private browser.
First, open the Mozilla Firefox, then just click on Firefox Menu(left top corner), and choose “Private Browsing”.


OR

Keyboard shortcut for private browsing ( for both browsers ), just press Ctrl + Shift + P.

Advantage of private browsing is that it does not create any log files and no history remain and no cookies.

Doing all this does not mean you are 100% safe. Don’t think so because nobody is 100% safe.
By doing this we reduce the chance of getting hacked and you make your account more safe.

Saturday, 1 September 2012

Shortcut Keys For Windows

Using short keys for windows will save your time and will make you more efficient.Below are some of the most commonly used Short cut Keys For Windows.

Short Keys For Windows
F1: Help
CTRL + ESC: Open start menu
ALT + TAB: Switch between open programs
ALT + F4: Quit program
SHIFT + DELETE: Delete item permanently
Windows + L: Lock the computer (without using CTRL + ALT + DELETE)

Windows program combination short cut keys
CTRL + C: Copy
CTRL + X: Cut
CTRL + V: Paste
CTRL + Z: Undo
CTRL + B: Bold
CTRL + U: Underline
CTRL + I: Italic

Short keys and Mouse Click
SHIFT + right click: Displays a shortcut menu containing alternative commands
SHIFT + double click: Runs the alternate default command
ALT + double click: Displays properties
SHIFT + DELETE: Deletes an item immediately without placing it in the Recycle Bin

Below are some Windows general Short keys
F1: Starts Windows Help
F10: Activates menu bar options
SHIFT + F10 Open a shortcut menu for the selected item (this is the same as right-clicking an object
CTRL + ESC: Open the Start menu (use the ARROW keys to select an item)
CTRL + ESC or ESC: Selects the Start button (press TAB to select the taskbar, or press SHIFT + F10 for a context menu)
CTRL + SHIFT + ESC: Open Windows Task Manager
ALT + DOWN ARROW: Open a drop-down list box
ALT + TAB: Switch to another running program (hold down the ALT key and then press the TAB key to view the task-switching window)
SHIFT: Press and hold down the SHIFT key while you insert a CD-ROM to bypass the automatic-run feature
ALT + SPACE: Displays the main window's System menu (from the System menu, you can restore, move, resize, minimize, maximize, or close the window)
ALT + - (ALT + hyphen): Displays the Multiple Document Interface (MDI) child window's System menu (from the MDI child window's System menu, you can restore, move, resize, minimize, maximize, or close the child window)
CTRL + TAB: Switch to the next child window of a Multiple Document Interface (MDI) program
ALT + underlined letter in menu: Open the menu
ALT + F4: Closes the current window
CTRL + F4: Closes the current Multiple Document Interface (MDI) window
ALT + F6: Switch between multiple windows in the same program

Windows short keys for a selected object
F2: Rename object
F3: Find all files
CTRL + X: Cut
CTRL + C: Copy
CTRL + V: Paste
SHIFT + DELETE: Delete item without moving to the Recycle Bin
ALT + ENTER: Open the properties for the selected object
To copy a file
Press and hold down the CTRL key while you drag the file to another folder.
To create a shortcut
Press and hold down CTRL + SHIFT while you drag a file to the desktop or a folder.

Short cut control keys
F4: Selects the Go To A Different Folder box and moves down the entries in the box (if the toolbar is active in Windows Explorer)
F5: Refreshes the current window.
F6: Moves among panes in Windows Explorer
CTRL + G: Open the Go To Folder tool (in Windows 95 Windows Explorer only)
CTRL + Z: Undo the last command
CTRL + A: Select all the items in the current window
BACKSPACE: Switch to the parent folder
SHIFT + click + Close button: For folders, close the current folder plus all parent folders

Windows Explorer navigation short keys
Numeric Keypad *: Expands everything under the current selection
Numeric Keypad + : Expands the current selection
Numeric Keypad -: Collapses the current selection.
RIGHT ARROW: Expands the current selection if it is not expanded, otherwise goes to the first child
LEFT ARROW: Collapses the current selection if it is expanded, otherwise goes to the parent
Properties control
CTRL + TAB/CTRL + SHIFT + TAB: Move through the property tabs

Other Window short keys shortcuts
Press SHIFT five times: Toggles StickyKeys on and off
Press down and hold the right SHIFT key for eight seconds: Toggles FilterKeys on and off
Press down and hold the NUM LOCK key for five seconds: Toggles ToggleKeys on and off
Left ALT + left SHIFT + NUM LOCK: Toggles MouseKeys on and off
Left ALT + left SHIFT + PRINT SCREEN: Toggles high contrast on and off

Microsoft Natural Keyboard keys
Windows key : Start menu
Windows key+ R: Run dialog box
Windows key + M: Minimize all
SHIFT + Windows key + M: Undo minimize all
Windows key + F1: Help
Windows key + E: Windows Explorer
Windows key + F: Find files or folders
Windows key + D: Minimizes all open windows and displays the desktop
CTRL + Windows key + F: Find computer
CTRL + Windows key + TAB: Moves focus from Start
Windows key + TAB: Cycle through taskbar buttons
Windows key + Break: System Properties dialog box
Application key: Displays a shortcut menu for the selected item
Keyboard window key shortcut
Windows key + L: Log off Windows
Windows key + P: Starts Print Manager
Windows key + C: Open Control Panel
Windows key + V: Starts Clipboard
Windows key + K: Open Keyboard Properties dialog box
Windows key + I: Open Mouse Properties dialog box
Windows key + A: Starts Accessibility Options (if installed)
Windows key + S: Toggles CAPS LOCK on and off

Dialog box keyboard short keys
TAB: Move to the next control in the dialog box
SHIFT + TAB: Move to the previous control in the dialog box
SPACE BAR: If the current control is a button, this clicks the button. If the current control is a check box, this toggles the check box. If the current control is an option, this selects the option.
ENTER: Equivalent to clicking the selected button (the button with the outline)
ESC: Equivalent to clicking the Cancel button
ALT + underlined letter in dialog box item: Move to the corresponding item
I hope that these shortkeys will help you save your time.You can also check Windows 7 Shortcuts keys

please..............comment
My Computer Doesn’t Recognize My USB Device – What Can I Do?

USB stands for Universal Serial Bus, and USB devices are those devices that use USB ports to send and receive data. This line of devices achieved huge popularity in the IT industry after getting their roots in the early part of 1990s. Before that, we had no other option than to settle with troublesome serial and parallel port configurations, in establishing communications with auxiliary devices like keyboard, mouse, external storage drive or a digital camera for example. Stable connection, simple integration and no need for a separate power supply are some of the key factors contributing to this massive acceptability and demands – USB devices are enjoying today.

As nothing is perfect in this world, USB ports and devices can also pose major concerns occasionally when they hide themselves and don’t get detected by the PC. Because of their wide range of applications and frequent use, the degree of frustration is often greater when they don’t show up. But, if you keep your cool, and try to sort out the problem, you can make them work quite easily – most of the time.
Why My Computer Doesn’t Recognize My USB Device?

There could be multiple reasons why your computer cannot detect your USB device. First of all we need to know that there are several USB ports in your PC or laptop and you can generally configure your device connecting to any one of these ports. However, some ports offer high speed data transfer and if you are connecting a device that requires speedy communication – better to tie it up with a high speed port.

From a user’s standpoint, no difference is visible from outside. But, internally that is not the case! USB ports are connected to multiple hubs inside, and some are connected to the root hub and some are connected to the generic hub. Generic hubs are used for high speed USB devices where as root hubs are used for devices like keyboards, mouse etc.

USB functionality of the entire PC is actually controlled by USB host controllers. Host controllers route signals to the root hub, with the root hub being in the 1st level of the hierarchy, and then the root hub distributes signals to the generic hubs underneath them. Therefore, if the root hub is down in signaling terms – all the USB ports will be down. In contrast, if a generic hub is down, that doesn’t necessarily mean all USB ports are down. It could be that the USB ports connected to one particular generic hub is not working because of a broken communication link with the root hub. Therefore you need to figure out how and to which port you should connect your USB device to.
How to Make Your PC Detect USB Device?

Let’s try the following action items to work towards a solution, keeping in mind that if you are lucky enough, you don’t have to complete all the steps;

1. First and the foremost thing to try and check the device in another PC, if you have access to it. Sometimes, a USB device itself could just go out of order, and in that case better not to look for faults at the wrong place.
2. If you feel, there is nothing wrong with your USB device, then the 2nd thing you check is putting it in another USB port – you know there are several USB ports out there in your PC.
3. If the same thing repeats after trying all the USB ports, go to Windows explorer and right click on the computer icon as shown in image 1. And then select “properties”. You will reach the control panel home.


4. Click on “Device Manager” and “Yes” to get to the device manager screen as shown in image 2.


5. At the bottom, you will see Universal Serial Bus controllers. Here if you don’t see this option by chance, then definitely you have USB feature disabled in your BIOS. Normally this occurs when you bought a brand new PC or laptop and your laptop was not configured right. Here you should reboot your PC and hit the F2 key when prompted just after booting process starts. Find out the option in your BIOS setup that deals with enabling and disabling USB controller as shown in image 3. Make sure it is enabled in your BIOS and then save changes and exit. It is not necessary that everything will match with image 3 because the BIOS you have in your PC could be totally different than mine. Reboot the PC – you should get your USB controllers detected this time in your control panel’s devices list.


6. Once you see USB devices are listed in your control panel and still the PC cannot detect the device, expand the Universal Serial Bus controllers tab in the device manager as shown in image 2. You will see several USB controller supported devices here; root hub, generic hub, mass storage devices etc. If you see any one of them showing any exclamation sign followed by a yellow mark on it, there is something wrong there. Right click on that device tab and hit properties. In the properties screen, hit the “drivers” button and “update driver” as shown in image 4. Get ready to provide the windows installation disk when asked to update the driver. After updating the driver, most likely the problem will go away and you will see “this device is working properly” in its properties window. If doing this doesn’t bring any good news for you either – let’s try the next trick.


7. Bring mouse over on the “USB root hub” in the same device manager screen as in image 2, right click on it and then select uninstall. Proceed with “yes” to confirm. Do the same for each and every device showing under Universal Serial Bus controller. After all of them are removed, reboot the PC. Windows Plug and Play should reinstall the entire USB functionality of your PC while rebooting. It may ask for the Windows installation CD to keep going, be ready to provide the installation CD in case the request comes in.

8. This should make your USB device detected as you have tried all the options. Sometimes, it is also possible that you have too many USB devices connected to your PC and when you add the next one, there is a conflict with the assignment of drive letters. This problem is quite different than what we were discussing above and it should be fixed by going into disk manager and assigning a new drive letter to your USB device.

9. In Windows 7, you can also use the automated utility to try and to fix all hardware problems including USB. To do this you can go to “Control Panel” – “Find and Fix Problems under System and Security” – “Hardware and Sounds” – “Hardware and Devices” – “Yes” to proceed.