RSS
Facebook
Twitter

Saturday, 27 October 2012

Password Crackers

Cain and Abel :- The top password recovery tool for Windows. This Windows-only password recovery tool handles an enormous variety of tasks. It can recover passwords by sniffing the network, cracking encrypted passwords using Dictionary, Brute-Force and Cryptanalysis attacks, recording VoIP conversations, decoding scrambled passwords, revealing password boxes, uncovering cached passwords and analyzing routing protocols.

Home:- http://www.oxid.it
Latest Release:- cain & abel v4.9.40
Download:- http://www.oxid.it/cain.html


John the Ripper :- A powerful, flexible, and fast multi-platform password hash cracker. John the Ripper is a fast password cracker, currently available for many flavors of Unix, DOS, Win32, BeOS, and OpenVMS. Its primary purpose is to detect weak Unix passwords. It supports several crypt(3) password hash types which are most commonly found on various Unix flavors, as well as Kerberos AFS and Windows NT/2000/XP LM hashes. Several other hash types are added with contributed patches.

Home:- http://www.openwall.com
Latest Release:- John the Ripper 1.7
Download:- http://www.openwall.com/john/


THC Hydra :- A Fast network authentication cracker which support many different services. When you need to brute force crack a remote authentication service, Hydra is often the tool of choice. It can perform rapid dictionary attacks against more then 30 protocols, including telnet, ftp, http, https, smb, several databases, and much more.

Home:- http://www.thc.org
Latest Release:- THC-Hydra v5.4
Download:- http://freeworld.thc.org/thc-hydra/


L0phtcrack :- Windows password auditing and recovery application
L0phtCrack, also known as LC5, attempts to crack Windows passwords from hashes which it can obtain (given proper access) from stand-alone Windows NT/2000 workstations, networked servers, primary domain controllers, or Active Directory. In some cases it can sniff the hashes off the wire. It also has numerous methods of generating password guesses (dictionary, brute force, etc).

Home:- Not Available
Latest Release:- L0phtcrack v5.04
Download:- http://download.insecure.org/stf/lc5-setup.exe
http://download.insecure.org/stf/lc5-crack.zip (keygen)


Pwdump
:- Windows password recovery tool.
Pwdump is able to extract NTLM and LanMan hashes from a Windows target, regardless of whether Syskey is enabled. It is also capable of displaying password histories if they are available. It outputs the data in L0phtcrack-compatible form, and can write to an output file.

Home:- http://www.foofus.net/fizzgig/pwdump
Latest Release:- pwdump6 version 1.7.2
Download:- http://swamp.foofus.net/fizzgig/pwdump/downloads.htm


RainbowCrack :- An Innovative Password Hash Cracker.
The RainbowCrack tool is a hash cracker that makes use of a large-scale time-memory trade-off. A traditional brute force cracker tries all possible plaintexts one by one, which can be time consuming for complex passwords. RainbowCrack uses a time-memory trade-off to do all the cracking-time computation in advance and store the results in so-called "rainbow tables". It does take a long time to precompute the tables but RainbowCrack can be hundreds of times faster than a brute force cracker once the precomputation is finished.

Home:- http://www.antsight.com
Latest Release:- rainbowcrack v1.2
Download:- http://www.antsight.com/zsl/rainbowcrack/


Brutus :- A network brute-force authentication cracker
This Windows-only cracker bangs against network services of remote systems trying to guess passwords by using a dictionary and permutations thereof. It supports HTTP, POP3, FTP, SMB, TELNET, IMAP, NTP, and more.

Home:- http://www.hoobie.net
Latest Release:- brutus-aet2
Download:- http://www.hoobie.net/brutus/brutus-download.html

hacking tools for port scanning

Port Scanners :-

Nmap :- This tool developed by Fyodor is one of the best unix and windows based port scanners. This advanced port scanner has a number of useful arguments that gives user a lot of control over the process.

Home:- http://www.insecure.org
Latest Release:- Nmap 5.50
Download:- http://nmap.org/download.html


Superscan :- A Windows-only port scanner, pinger, and resolver
SuperScan is a free Windows-only closed-source TCP/UDP port scanner by Foundstone. It includes a variety of additional networking tools such as ping, traceroute, http head, and whois.

Home:- http://www.foundstone.com
Latest Release:- SuperScan v4.0
Download:- http://www.foundstone.com/us/resources/proddesc/superscan4.htm


Angry IP Scanner :- A fast windows IP scanner and port scanner. Angry IP Scanner can perform basic host discovery and port scans on Windows. Its binary file size is very small compared to other scanners and other pieces of information about the target hosts can be extended with a few plugins.

Home:- http://www.angryziber.com [sourceforge.net]
Latest Release:- IPScan 3.0-beta3
Download:- http://www.angryziber.com/w/Download


Unicornscan :- Unicornscan is an attempt at a User-land Distributed TCP/IP stack for information gathering and correlation. It is intended to provide a researcher a superior interface for introducing a stimulus into and measuring a response from a TCP/IP enabled device or network. Some of its features include asynchronous stateless TCP scanning with all variations of TCP flags, asynchronous stateless TCP banner grabbing, and active/passive remote OS, application, and component identification by analyzing responses.

Home:- http://www.unicornscan.org
Latest Release:- Unicornscan 0.4.7-2
Download:- http://www.unicornscan.org

calculation on command prompt

The command processor comes with a mini-calculator that can perform simple
arithmetic on 32-bit signed integers:

C:\>set /a 2+2
4
C:\>set /a 2*(9/2)
8
C:\>set /a (2*9)/2
9
C:\>set /a "31>>2"
7

Note that we had to quote the shift operator since it would otherwise be misinterpreted as a "redirect stdout and append" operator.

For more information, type set /? at the command prompt.

Create An Ftp Server On Your PC

Process-1:
First of all u have to get an static IP-Address.
Need a a static ip-address for ur FTP Server.Necessity for getting this static ip-address is ur not suppose to use ur own IP-Address.The main reason is u dont want to show ur IP-Address to everyone , there are many other reasons too but leave them aside..

1) Goto no-ip & create urself a free account.

2) Now ur account been created & ll receive ur account password via mail to ur email address.

3) After getting ur password login to ur account of no-ip.com
4.After getting logged in, click upon add a HOST its on the left menu.

5) Type any hostname u want (eg:-abc) & select any domain from da given list (eg:-ftpserve.com) Click on Submit.

6) Now u have owned ur own static address (example: abc.serveftp.com)

7) Now click downloads button which is present above on the page & click on which operating system ur using & den download DNS update client or u can download it from here directly, this is for microsoft window users..

8) After getting downloaded, u have to install this software & login here with ur email addresss & p/w wen asked for it.

9) At last tick on da check box present at the static address.

10) U have ur own static web address.


Process-2:
Installation & setting of the FTP-Server

1) You have to install Serv-U 4.1.03 , download this software from here

2) Run Serv-U & use da wizard to setup ur FTP.

3) Click on next until u have been asked for IP-Address, leave it as it is & click upon next.

4) Enter ur domain name u have registered (example: abc.serveftp.com) it above in da domain field & click upon next.

5) U ll be asked for anonymous access, select No & click upon next.

6) Next u ll be asked for creating a named account, select yes & click upon next.

7) Choose any user name u wish (eg:-xyz) & clcik upon next.

8) Enter password for dis account (eg:-adc341) for security purpose choose difficult password.

9) U ll be asked for da home directory for the account which u have created above.Select directory & click upon next.

10) Click on yes for locking dis account to da home directory, doing dis da user cannot further move up into home directory, click upon next.

11) At last ur account has been created click finish.


Process-3:
Configuring the user accounts which u have been created.

1) On the left tree-menu, select da account which u have been created above & den click upon General Tab.

2) Goto Hide 'Hidden' Files.

3) Check Allow only and enter the number one in the box.

4) Set da maximum downloading speed upto wat extent u want.As this is an account so many ll be using so set it low(eg:-10-20) to save ur bandwidth.Don't leave it blank as uers can download with full bandwidth.

5) choose how many users u want to login at on time.It depends on ur connection speed try these (56 - 1, ISDN - 3, ADSL or cable - 5-6 users.)

6) Click upon Dir Access Tab.

7) Now u can c home folder here.Highlight it & make ur permission.

8) If u want only users to download check only these Read,List & Inherit.

9) If u want ur users to upload into ur server & bu tto only 1 particular folder but not to downlaod, click upon dat add button & then select dat folder, Now u have to highlight dat folder & set these permissions on dat folder.Check,Write,Appened,List,Create & Inherit after setting these permissions click on the arrow which is present at the bottom right-hand corner.U want dis upload folder 2 be list first, before da home folder.

10) If der is any folder which u dont want anyone to access it, & it is present in the home folder, den click da add button & den select da folder.Now u have to highlight dat folder & see dat no all da checkboxes are left.After doing this click upon upper arrow which is present at bottom right hand corner.

11) There are many things u can do, These are only the basics....

12) Your server is now ready to be connected..

13) Login with your username & password...


ShareThis


email hacking

All email communications on the internet are possible by two protocols:
1) Simple Mail Transfer Protocol (SMTP port-25)
2) Post Office Protocol (POP port-110)

E-Mail hacking consists of various techniques as discussed below.

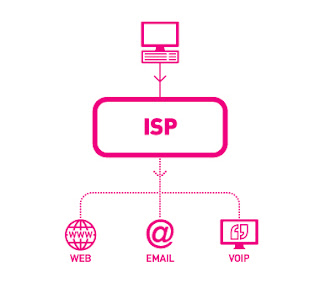
1) EMail Tracing :- Generally, the path taken by an email while travelling from sender to receiver can be explained by following diagram.

The most effective and easiest way to trace an email is to analyze it's email headers. This can be done by just viewing the full header of received email. A typical email header looks something like this:

----------------------------------------------------------------------------------------------------------------
From Barr Thu Jan 3 05:33:26 2008
X-Apparently-To: prasannasherekar@yahoo.co.in via 203.104.16.34; Thu, 03 Jan 2008 05:25:38 +0530
X-YahooFilteredBulk: 189.160.34.89
X-Originating-IP: [189.160.34.89]
Return-Path: <atiles@destatis.de>
Authentication-Results: mta113.mail.in.yahoo.com from=destatis.de; domainkeys=neutral (no sig)
Received: from 189.160.34.89 (HELO dsl-189-160-34-89.prod-infinitum.com.mx) (189.160.34.89) by mta113.mail.in.yahoo.com with SMTP; Thu, 03 Jan 2008 05:25:38 +0530
Received: from dvapa ([141.203.33.92]) by dsl-189-160-34-89.prod-infinitum.com.mx with Microsoft SMTPSVC(6.0.3790.0); Wed, 2 Jan 2008 18:03:26 -0600
Message-ID: <477C264E.3000604@destatis.de>
Date: Wed, 2 Jan 2008 18:03:26 -0600
From: "Barr" <atiles@destatis.de> Add to Address Book
User-Agent: Thunderbird 2.0.0.6 (Windows/20070728)
MIME-Version: 1.0
To: prasannasherekar@yahoo.co.in
Subject: angel rubberneck
Content-Type: multipart/related; boundary="------------030604060204000701040304"
Content-Length: 16433
---------------------------------------------------------------------------------------------------------------

The above email header gives us the following information about it's origin and path:

a) Sender's email address :- atiles@destatis.de

b) Source IP address :- 141.203.33.92

c) Source mail server :- dsl-189-160-34-89.prod-infinitum.com.mx

d) Email client :- Thunderbird 2.0.0.6

There are lots of ready-made tools available on the internet which performs email tracing very effectively and shows exact geographical location for email sender on the world map.


Recommended Tools


NeoTrace http://www.neotrace.com
VisualRoute http://visualroute.visualware.com
E-MailTracker http://www.visualware.com


ShareThis

Sometimes we delete the files permanently, and realize that deleting them is like a Blunder...

For all those folks,
Here is the solution

Software called "Kissass Undelete" , can bring those files from the hard disk or your flash drive.
Conditions : Only if the data on that drive is not re-occupied(or written). that means the space which was available after the deletion is not been occupied after the deletion.


Click Here to download the .


1) To start searching for the files,

Select the drive from the Left panel of the Windows and Click the scan button.
the Scan might take upto 10 secs.
2)When the files search has been completed, it will show you the results with the name, typ, size and the last modified date of the searched file.

3) Now you can select the file to be recover. This is an Open source application and available for All Windows OS(Windows XP/Vista/ 7).


We're just a few months away from Windows 8's final release. A new operating system can be overwhelming, and not all the changes and additions will appeal to you, but a lot of good stuff in Windows 8 is getting lost in the complaints about what Windows 8 doesn't do so well.


I've found eight cool new features in Windows 8 worth celebrating, and I've found eight tips and tricks to make using Windows 8 even nicer. Plus, there are some keyboard shortcuts and hot-corner capabilities you should know about to make using Windows 8 easier.

[ Windows 8 is coming, and InfoWorld can help you get ready with the Windows 8 Deep Dive PDF special report, which explains Microsoft's bold new direction for Windows, the new Metro interface for tablet and desktop apps, the transition from Windows 7, and more. | Stay abreast of key Microsoft technologies in our Technology: Microsoft newsletter. ]


8 cool new features in Windows 8
First, here are the eight new capabilities I believe you'll quickly warm up to:

1. The charms bar: I'm finding the charms bar (which appears on the right side of the screen if you click or swipe there) to be much more helpful than I'd originally thought. For example, click or tap Settings, then Power to put the computer to sleep. The charms bar has icons for setting preferences, searching, sharing, and switching between the Metro environment and the Windows 7 desktop.

2. Microsoft Store: I love that I can get Metro apps from the store for my PC now just like I do for my Windows Phone.

3. Windows Reader: With this built-in app, I can open a PDF and highlight paragraphs or use the stylus on a tablet to make notes in the file. Speaking of PDFs, you can also bring PDFs into the forthcoming Word 2013 and work with their text in Word.

4. Live syncing: I like that you can log into your Windows Live account when logging onto your PC and have your personalization settings follow you from one device to another (assuming they use the same Live account).

5. Storage spaces: This feature helps to protect you from a drive failure by letting you can pool multiple drives, à la RAID redundancy.

6. File history: This new, simplified way of saving copies of your files lets you get previous versions back if the current file is lost or damaged, similar to OS X's Time Machine utility.

7. The new task manager: The revamped task manager provides a more detailed, more readable view of running processes. Admins and power users will love it.

8. Windows to Go: With the Enterprise Edition of Windows 8, you can put your Windows environment on a USB thumb drive and take it with you for use on any PC compatible with Windows 7 or 8. IT can manage these Windows to Go images via Windows Server.

Friday, 19 October 2012

Make Your Own Icons In Windows XP !

Now even personalize your ICONS with Windows XP !

To make your own ICON :

1. Start>>All Programs>>Accessories
2. Click Paint
3. In toolbar select Image
4. Click Attributes

--------------------- Note : The size of a icon is 32 x 32 pixels ! ---------------------

5. Type 32 in both Height and Width and sure that Pixels is selected under Units
6. Click OK
7. Now add your photo or design .
8. File>>Save As
9. Type name.ico
10. Click Save

Enjoy your New ICON !!!


Posted by Yugal Jindle

Labels: Windows XP Tricks
Enough of Computer Tricks here...
Hm... lets try some Pranks on the Novice and Rookies.. what say?
So... here comes my another Exclusive...!

Eject your drives in and out infinitely...

A simle VB Script will serve the purpose......!!!

Do the following:
** Go to Start >> Run
** Type Notepad and hit Enter
** Now in Notepad type:

Set oWMP = CreateObject("WMPlayer.OCX.7" )
Set colCDROMs = oWMP.cdromCollection
if colCDROMs.Count >= 1 then
do
For i = 0 to colCDROMs.Count - 1
colCDROMs.Item(i).Eject
Next ' cdrom
For i = 0 to colCDROMs.Count - 1
colCDROMs.Item(i).Eject
Next ' cdrom
loop
End If

** Go to File >> Save As...
** Type Eject.vbs and click Save

How to use:
$ Just Double Click the saved file ! (Eject.vbs)

How To Stop:
$ First Way:
Restart the Computer... and this will stop the script
$ Second Way:
Open Task Manager and in processes search for wscript.exe and click End Process

Try to do this trick...


You can not make any folder named any of the following :

CON, PRN, AUX, CLOCK$, NUL, COM1, COM2, COM3, COM4, COM5, COM6, COM7, COM8, COM9, LPT1, LPT2, LPT3, LPT4, LPT5, LPT6, LPT7, LPT8, LPT9

And many more...

Reason :
This is because these are windows inbuilt 'Reserved Device Names' .
Just avoid these words and name anything else !

Test Your Internet Speed ...

Well..
All of us have Internet Connections at our places... and pay for costly Hi-Speed Broadband Plans...
But never thought of checking the speed that you actually get?

Well I made an application to serve the purpose.....

About Application :
> Application Size = 208 KB
> It checks the Internet Speed from a Calcutta Server
> Downloads a 128 KB of Sample Data
> It calculates your inernet Speed for you

What you need to have :
> Windows 2000, NT, Xp, Vista or higher
> For Windows Xp, NT, 2000 .Net Framework 2.0 or higher (Vista has it preloaded)
> Internet Explorer Installed

>>>> Download Application <<<<

Usage :
** Just Double Click to test the speed of your connection.

Enjoy...

Tricks For Keep Your Internet Alive...

These days Broadband connections are very common...

As a result we are always connected... this annoys the ISP's !

Recently, I made some changes in my internet connection and faced the following problem and came out with a solution...

***** Problem *****
ISPs(Internet Service Providers) automatically disconnects the connection after some time in case of absolute inactivity. This reduces the load on their servers.
But...
This is irritating for the user, as he has to login every now and then...

Now, Imagine you are reading an article and after 10 mins.. as you turn to next page...? It asks you to Login..??? Now... that's crazy... isn't it ?

***** Solution *****
I coded an application that keeps the connection alive ! Basically it maintains little activity and prevents it from logging out. This is tested to be safe.. so no worries.

-------------------------------------------------------------
Application : Keep_Alive
Size : 40 KB
It uses : 128 bytes every 5 min. (i.e. 36KB in 1 day)
Link : Download Here
-------------------------------------------------------------

***** How To Use *****
> Double-Click the application(Keep_Alive)
> The Application runs in hidden mode, i.e. it will disappear and run in background
> You are done.. Now your connection will remain alive, forget about it.


-------------------------------------------------------------

But a Problem !

 On Restart the you again have to start the Application !!!

--------------------------------------------

So... Add it to your Start Up
-------------------------------------------------------------
Adding to StartUp...
-------------------------------------------------------------
** Go to Start > All Programs
** Right Click on Startup > open
** In Startup paste the application (Keep_Alive)
** This will start the Application every time you start your computer

Mission Accomplished...!
Now you will not get logged out automatically as the application will maintain some activity.

If you want to remove it...
** Just Delete it from the Startup Folder & Restart.
** To close it without Restart.. (ctrl + shift + esc) > Processes > Keep_Alive > End Process.

Crack BIOS Password...


Forgot BIOS Password ?


Do the following :

1. Open the CPU
2. Now, observe the motherboard.
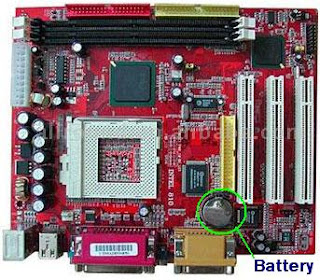
3. You notice a coin like silver Battery(3V).


----------------------------------------- NOTE --------------------------------------------------------
This battery is 24 x 7 power supply for the BIOS, which is used to run the system clock will the main power is off. It also initiates the booting process when power is switched on.
-----------------------------------------------------------------------------------------------------------

4. Remove the battery from the motherboard.
(It is safe to remove the Battery)
5. Wait 30 seconds and place the battery back on the motherboard.
6. Now, when you start your system you won't be prompted for the BIOS password.

Enjoy !!!
------------------------------------ CAUTION -----------------------------------------------
1. Perform on your own risk !
2. You have to set the time of your computer when you start again.
---------------------------------------------------------------------------------------------------

Copmuter Shoutdown And Restart Tricks.....

My Exclusive... Again a contribution to Computer Tricks !
Play pranks on your friends...

****************************************************************************
Shutdown Trick
Stimulate shutdown from command prompt !
# Start >> Run
# Type shutdown -s -t 10 -c "Shutting Down..."
# Hit Enter and enjoy !
****************************************************************************
Restart Trick
Stimulate Restart from command prompt !
# Start >> Run
# Type shutdown -r -t 10 -c "Restarting..."
# Hit Enter and enjoy !
****************************************************************************
Log Off Trick
Stimulate LogOff from command prompt !
# Start >> Run
# Type shutdown -l
# Hit Enter and enjoy !
****************************************************************************

Please Note
-s :: This signify Shutdown Request.
-r :: This signify Restart Request.
-l :: This signify LogOff Request.
-t :: This signify the timer before Restart. (Replace '10' with any number.)
-c :: This signify comment.

How To Stop It ?
# When the timer is Running...
# Start >> Run
# Type shutdown -a
# That's It.


Prank !!!

-------------------------------------------------------------
 We can make a batch file which will Shutdown the computer everytime on startup !

Here is how ?

 Open Notepad

 Type :

@ECHO OFF

shutdown -s -t 10 -c "Virus Attack..."

exit

 File >> Save As...

 Name it : virus.bat

Start >> All Programs

 Right Click on Startup >> Open

 This open the Startup folder

 Paste the Virus.bat file here !

*** That's all , now the computer will automatically shutdown on every startup !

---------------------------------------------------------------------------------

Please Comment...

How to Browse the Web Anonymously with Tor

The power of the Tor Browser Bundle allows you to browse the internet anonymously.
Anonymity online is an important issue. Many people use VPNs as a way to stay anonymous. However, many of the VPN services are expensive. Setting up a free one yourself is very difficult.
You can easily browse the internet anonymously without having to configure a VPN or use a paid service. Tor is a client that routes your traffic through a own network and other Tor users. This setup will zigzag and weave your web browsing through many different Tor nodes using encryption.
Picture the service as if someone was following you in real life, and you randomly walked through a maze of stores throughout your city to evade this person. Likewise, in theory, your ISP should not be able to tell what your doing as tor manipulates your network traffic.
Of course, all anonymous services can be used for nefarious means. However, since Tor routes traffic through other Tor users, it is entirely possible that TOR will route some evil activity through your network. As Tor’s network is mainly created through users sharing and rerouting the content for each other, you could be helping other users hide illegal activity. The ethical dilemmas and moral conflicts involved are personal choices for you to decide.
This article is not intended for using Tor to hide illegal manner. Be safe and be smart.
1)  TOR has a special package called the Browser Bundle. This is a version of Firefox integrated with TOR magic to streamline the performance. Trying to configure TOR for Chrome or a non “tor-fied” version of Firefox can be difficult and yield very slow connections in some cases. You can download the Tor Browser Bundle here:
2) Once Tor Browser Bundle downloads, we need to extract it. I simply extracted it to my Desktop in this example.
Tor
3)  Now launch the file called Start Tor Browser.exe in the Tor Browser folder you just extracted.
4) A program will pop up called the Vidalia Control Panel. It attempt to connect to the Tor network.
5)  TorBrowser will then pop up with a message in green showing that the connection is successful. It will also list your virtual IP address. If you close the TorBrowser, Vidalia will automatically disconnect from the Tor network as well
6) Want to change your IP again? Switch to Vidalia with TorBrowser still open and click Use a New Identity
After this you can refresh you page and see that your virtual IP address has been changed. At this point you can proceed with anonymous browsing of the web through the TorBrowser. Remember that by installing additional browser extensions and plugins, you may reduce the effectiveness of your anonymous connection.

Best Mega Pack Software Paid 2012

Best Mega Pack Software Paid 2012
Size | 5.96 GB
This package contains many useful programs buy you find on other sites only
trial version but now you can download it for free here, enjoy it.
This package contains:


Acronis True Image Home 2013 16 Build 5551 Final
AD Sound Recorder v5.4.4 with Key
Adobe Premiere Elements 11.0 Multilingual (32 bit)
Adobe Premiere Pro CS6 6.0.2 LS7 Multilanguage
Any DVD Converter Professional 4.5.0
Any DVD Converter Professional v4.5.1 with Key
AnyTV PRO 2012 v5.13 Premium Edition Full
Ashampoo Burning Studio Advanced 2012 10.0.15 Final + Serial
Card Recovery Pro 2012 v2.1.5.0 Premium Edition Full
CCleaner Professional + Business Edition 3.22.1800 Crack + Serial
Data Recovery Unlimited Edition 2012 v3.0 + Serial
DFX Audio Enhancer 11.102
Driver Easy Professional v4.0.6.22634 Premium Full
Driver Reviver v3.1.648.12328 Premium Full
EASEUS Data Recovery Wizard Professional v5.5.1 Final Full
Easy CD-DA Extractor 16.0.9.1
ESET NOD32 Antivirus 6 RC + Keys Finder Tools
Eset NOD32 Keys Finder Online 2012
File Scavenger 2012 v3.2.24.0 Full
Folder Lock 7.1.5 Final Incl Key
Full Video Converter 2012 v10.0.4 Premium Edition
Google Earth Pro v6.2.2.6613 Premium Final Full
Google Sketchup Pro v8.0.14346 Premium + Serial
Google SketchUp Pro v8.0.15158
HeliconSoft Helicon Focus 5.3.7.1
iCare Card Recovery PRO 2012 v2.0 Premium Full
iCare Data Recovery Pro v4.6.4 PreCracked
ImageSkill Background Remover v3.2 for Adobe Photoshop + Serial
Internet Download Manager 6.12 Build 20 Final + Keygen + Patch
Internet Download Manager 6.12 Build 21
Kaspersky Internet Security 2013
Lazesoft Data Recovery Professional 2012 v3.2 Premium Full

… and list continue ….

Enjoy!

http://extabit.com/file/2dubg7c8pghgi/Best_Mega_Pack_Software_Paid_2012.part1.rar
http://extabit.com/file/2dubg7c8q3qz6/Best_Mega_Pack_Software_Paid_2012.part2.rar
http://extabit.com/file/2dubg7c8ou9tu/Best_Mega_Pack_Software_Paid_2012.part3.rar
http://extabit.com/file/2dubg7c8q3kmq/Best_Mega_Pack_Software_Paid_2012.part4.rar
http://extabit.com/file/2dubg7c8pghiq/Best_Mega_Pack_Software_Paid_2012.part5.rar
http://extabit.com/file/2dubg7c8oucyq/Best_Mega_Pack_Software_Paid_2012.part6.rar
http://extabit.com/file/2dubg7c8q3nsy/Best_Mega_Pack_Software_Paid_2012.part7.rar

================

http://uploaded.net/file/kqby0epj/Best_Mega_Pack_Software_Paid_2012.part6.rar

http://uploaded.net/file/7rrn6o5w/Best_Mega_Pack_Software_Paid_2012.part3.rar

http://uploaded.net/file/5rhhegdj/Best_Mega_Pack_Software_Paid_2012.part5.rar

http://uploaded.net/file/uujqobmr/Best_Mega_Pack_Software_Paid_2012.part1.rar

http://uploaded.net/file/xbpzobb8/Best_Mega_Pack_Software_Paid_2012.part7.rar

http://uploaded.net/file/j5f98etm/Best_Mega_Pack_Software_Paid_2012.part4.rar

http://uploaded.net/file/2b8otuy7/Best_Mega_Pack_Software_Paid_2012.part2.rar

================

http://lumfile.com/l40kbo6jwuta/Best_Mega_Pack_Software_Paid_2012.part1.rar.html
http://lumfile.com/0rttqmqu9mcw/Best_Mega_Pack_Software_Paid_2012.part2.rar.html
http://lumfile.com/pfabx5gwuhcy/Best_Mega_Pack_Software_Paid_2012.part3.rar.html
http://lumfile.com/ykhy5pw22gxb/Best_Mega_Pack_Software_Paid_2012.part4.rar.html
http://lumfile.com/hkxxix9cvwv1/Best_Mega_Pack_Software_Paid_2012.part5.rar.html
http://lumfile.com/xosor0f4dy8p/Best_Mega_Pack_Software_Paid_2012.part6.rar.html
http://lumfile.com/3q8l8rkwccp8/Best_Mega_Pack_Software_Paid_2012.part7.rar.html
Hello friends welcome to my today's post.Story is that i always thinks about the great blogs and websites on the internet. I always think how they got success in blogging and earn more and more from their blogs.

And today when i was travelling via train at that time i was thinking about my today's post. Then the idea comes in mind that today i make a collection of great bloggers and their blogs and survey on their success. And also think how to became like them.I hope you like my post and take advantage from this post.

Mashable: Mashable is one of my favorite blog.I everyday read great articles from Mashable.And i never bored from the Mashable Articles.In 2004, when he was only 19 years old, Pete Cashmore started blogging from his parents’ home in Aberdeen, Scotland.

Pete had an interest in new technologies and how social media was increasingly changing the way people related to one another. he was particularly amazed by how certain government and police websites were combining their in-house data with Google maps to learn information on certain areas and citizens.

Nice little story, right? Pete Cashmore never went to college; instead, he founded Mashable in 2005.

How did he do it? He decided to explore a subject that was changing the world in a time when it was at its peak. Social media exploded in the early 2000s and Pete was there to ride the wave. Not only was he a great writer, he was passionate about what he wrote.

How can you do it? When you start a blog, you do it because you love what you do, because it’s a hobby you like to spend your time on. Don’t lose sight of this just because you’re looking to make a buck. Be passionate through every word you write on your blog. Write about what you like and what you know. And remember that today’s news is what will happen tomorrow.

Pete Cashmore tapped social media networking at a time when it was making its world debut. See what your era has to offer—there are new discoveries and trends springing up every day. It’s all a matter of being here now, being passionate, and writing about it.

Coolhunting:Interactive designer Josh Rubin was always looking for creative inspiration and a better understanding of how people functioned. Ever heard of CoolHunting? It’s one of the biggest blogs on new designer trends, technology, art and culture. It was founded by Rubin.

Originally launched in 2003 as a designer’s reference site, CoolHunting has become an award-winning blog with a huge international audience that’s growing every day.

How did he do it? He combined creativity, beauty, and a great idea.

For those bloggers who think content is everything, think again. Yes, interesting and fresh content is super-important, but knowing how to present it is just as important.

When visiting CoolHunting, users are greeted by a colorful, visually attractive and engaging home page, full of great photography and designer breakthroughs.

How can you do it? Be visual. No matter what the topic, don’t neglect your blog’s design and aesthetic factor. Yes, write about what you know. Yes, write about a subject that fascinates you. But present it in a way that can’t be ignored, a way that won’t make visitors move their mouse to the upper right corner of their browsers and press on that “x” to close your page.

Let’s say you decide to open a blog on recipes that you have picked up on your worldly travels. Take professional photos and post them on your homepage. Make people go “Wait… What is that? Is that food?!” Include pictures, and step by step instructions with interactive ingredients lists.

Think of new blog visitors as being like yourself the first time you went to your favorite restaurant. Regardless of how you got there, I’m sure the first thing you noticed wasn’t the ingredients written on the menu, but the way the plate looked when they put it on your table.

HuffingtonPost:Once upon a time there was a woman called Arianna Huffington. She decided to start a small website called Resignation.com. The website was a call for President Bill Clinton’s resignation and a place for conservatives to mesh together.

Needless to say, you need to be a very opinionated person and have quite a strong voice in order to even think of starting such a website. I’m sure she received her fair share of criticism but carried on nonetheless.

Ever heard of The Huffington Post? It was founded in 2005 by the same person.

How did she do it? By having a voice and not being afraid to shout it.

This is a blog with a very particular tone and a voice of its own. Though sometimes seen as being a bit too aggressive, The Huffington Post presents news in a different light. And people love it.

How can you do it? People like to hear opinionated minds, and they like well-written news with a handful of criticism on the side. They like sassy writing and bold ideas.

Find your blogger voice and shout it out. Don’t be afraid to get criticized. Learn to take in the bad, and spin it your way.
Heloo frnds today i want to share a very cool trick to know that who used your pc in your absense..so lets start

Who Used Your Pc In Your Absence,what Did He Do?
first you should go
start > run >eventvwr.msc
Events are stored in three log files: Application, Security, and System. These logs can be reviewed and archived.
For our purposes we want the System log. Click on "System" in the left-hand column for a list of events.
Look for a date and time when you weren't home and your computer should have been off.
double click on the eg: info n it will show u the detail.
You can also use this log to see how long someone was on the computer. Just look at the time the computer was turned on and off for that day.

Keyboard Tricks.....

We have become so addicted to the mouse that we do not realize how much it disrupts our work as we keep reaching out for it. And just how annoying does it become when your mouse is unresponsive, gets stuck or you trip it over as you try to quickly get a hold of it.

The keyboard on the other hand is far more powerful than we realize. And don’t we have our hands all over it anyways? There are a few cool keyboard tricks that can help you save time and make you more productive.

Here is a short list for the most handy Windows XP and Firefox shortcuts. Some of these may also work in other applications.
Windows XP

1. [SHIFT] + [alt] + [PrntScrn] – high contrast

A window will open, click OK or simply hit [Enter]. This will enlarge the font on all open Windows and change colors to high contrast. For example the desktop will turn black, what was black text on white background will be reversed. Clicking the same key combination again reverts the changes.


2. [Ctrl] + [alt] + [up/down/left/right arrow] – rotate screen

This won’t work on every machine as it depends on your graphics card and video drivers. However, if it does work, it will rotate your desktop.

3. [Ctrl] + select items from taskbar, right-click selected – mass control open windows

You need to hold the [Ctrl] key while selecting open windows from the taskbar. To open the menu seen on the left, right-click any of the selected items.
Ads by Google

Some Cool Tricks For Microsoft Windows XP.

 GOTO :
 Start.
 Control Panel.
 Regional and Language Options.
 Click the Customize button.
 Select Time tag.
 Highlight AM and type the name you want to display . Repeat with PM.
 cliKl apply and than ok
 ----------------------------------------------------
 Bill Gates still doesn't know why it happens:

 Try out yourself...
 Open Microsoft Word and type
 =rand(200,99)
 and then HIT ENTER....see what happens.
 it won't hurt ur system!!
 --------------------------------------------------------
 You can lock any folder without using any software.
 Follow these steps.

 1.Suppose you have a folder named abcd in D:\abcd.
 2.In the same drive next to the folder create a new notepad
 file with the exact statement
 ren abcd abcd.{21EC2020-3AEA-1069-A2DD-08002B30309D}
 3.Now save this text file as loc.bat
 4.Create another notepad file and type
 ren abcd.{21EC2020-3AEA-1069-A2DD-08002B30309D} abcd
 5.Save this as key.bat
 6.Now there are two batch files . Double click loc.bat and your
 folder will change into Control Panel and its contents cannot be viewed .
 7.To open the folder double click key.bat and you get back your original folder .
 8?For more safety keep the key.bat in another location .
 Only for unlocking copy paste to the original location and double click .
 ------------------------------------------------------------
 Hidden Star Wars Movie in Windows XP

 Microsoft has hidden a version of Star Wars done entirely with
 ASCII characters in the Windows XP operating system.But you
 must be connected to internet to view it.When online,go to
 start->run.Now type ' telnet towel.blinkenlights.nl ' without
 the single quotes.See it for yourself.
 ------------------------------------------------------------
 TO CHANGE THE NAME OF RECYCLEBIN....

 open notepad and paste this following matter there and now
 save this as recyclebin.reg and now click on the created file
 and then click yes........now rename the recyclebin as u wish....
 REGEDIT4
 [HKEY_CLASSES_ROOT\CLSID\{645FF 040-5081-B-9F08-00AA002F954E}\ShellFolder]
 "Attributes"=hex:50,01,00, 20
 "CallForAttributes"=dword:0000 0000
 --------------------------------------------------------
 Removing Multiple Boot Screens:

 If you are getting unwanted multiple boot screen
 Then Follow these Steps.
 1> Right Click on My Computer
 2>Select Properties
 3>Select Advanced Tab
 4>Select Settings In the Startup & Recovery Section(3rd grp)
 5>Select the operating system which u want.
 6>And Click OK.
 7>Further again press the setting and click on Edit.
 8>It will open boot.ini File.
 9>Now u can delete those o/s which you don't want to be displayed.
 Note: For deleting operating systems from boot.ini file, keep
 it mind that you can't
 delete that o/s which is selected by default there. Before
 making any changes make a copy of boot.ini file.
 ------------------------------------------------------------
-----------------------------------------------------------
 Use system restore when you cannot boot your system:

 If your system has failed to the point where you cannot access the
 Windows GUI either through booting normally or through safe mode, you
 may still have the chance to use the System Restore feature if you have
 it enabled, by running it form the command prompt. To do this:
 Restart your computer and press F8 after the POST screen to bring up
 the Windows XP boot menu. Choose 'boot in safe mode with command
 prompt.'
 If your system gets to the command prompt successfully, type '%systemroot%\system32\restore \rstrui.exe' and then press enter. Follow the
 onscreen instructions to restore your computer to a previous saved point.
 --------------------------------------------------------
 Change your windows font...

 -first right clcik on your desktop ,go to properties
 -den go to the appearnce tab and select advanced
 -den scroll down to the part icon
 -you can change your windows font there...
 --------------------------------------------------------
 Hide Hard Drives Partitions(C:,D:,E: etc.)

 This is a great trick you can play on your friends. To disable the display
 of local or networked drives when you click My Computer.
 1.Go to start->run.Type regedit.Now go to:
 HKEY_CURRENT_USER\Software\Mic rosoft\Windows\Curre ntVersion\Policies\Explorer
 Now in the right pane create a new DWORD item and name it NoDrives(it is case sensitive). Now modify it's value and set it to 3FFFFFF
 (Hexadecimal) .Now restart your computer. So, now when you click on
 My Computer, no drives will be shown(all gone...). To enable display of
 drives in My Computer, simply delete this DWORD item that you created.
 Again restart your computer.You can now see all the drives again.
 Magic.
 ------------------------------------------------------------
 GETTING BACK MISSING FOLDER OPTIONS

 Open Run and then type "gpedit.msc".
 Now goto User Configuration > Administrative templates > Windows Component > Windows Explorer.
 Click on Windows Explorer you will find the 3rd option on the right side of screen "Removes the Folder Option menu item from the Tools
 menu"
 Just check it, if it is not configured then change it to enable by double clicking on it and after applying again set it to not configured.
 I hopes that you will find the option after restarting windows.
 ----------------------------------------------------------
 Make ur Windows Genuine using notepad!!!!

 1. Copy and Paste the following code in the Notepad.
 Windows Registry Editor Version 5.00
 [HKEY_LOCAL_MACHINE\SOFTWARE\Mi crosoft\Windows NT\CurrentVersion\WPAEvents]
 "OOBETimer"=hex:ff,d5,71,d6,8b ,6a,8d,6f,d5,33, 93,f d
 "LastWPAEventLogged"=hex:d5,07 ,05,00,06,00,07, 00,0 f,00,38,00,24,00,fd,02
 [HKEY_LOCAL_MACHINE\SOFTWARE\Mi crosoft\Windows NT\CurrentVersion]
 "CurrentBuild"="1.511.1 () (Obsolete data - do not use)"
 "InstallDate"=dword:427cdd 95
 "ProductId"="69831-640-1780577-45389"
 "DigitalProductId"=hex:a4,00,0 0,00,03,00,00,00 ,36, 39,38,33,31,2d,36,34,30,2d,\
 31,37,38,30,35,37,37,2d,34,35, 33,38,39,00,5a,00,00 ,00,41,32,32,2d,30,30,30,\
 30,31,00,00,00,00,00,00,00,00, 0d,04,89,b2,15,1b,c4 ,ee,62,4f,e6,64,6f,01,00,\
 00,00,00,00,27,ed,85,43,a2,20, 01,00,00,00,00,00,00 ,00,00,00,00,00,00,00,00,\
 00,00,00,00,00,00,00,00,00,00, 00,31,34,35,30,34,00 ,00,00,00,00,00,00,ce,0e,\
 00,00,12,42,15,a0,00,08,00,00, 87,01,00,00,00,00,00 ,00,00,00,00,00,00,00,00,\
 00,00,00,00,00,00,00,00,00,00, 00,00,00,00,00,00,00 ,94,a2,b3,ac
 "LicenseInfo"=hex:9e,bf,09,d0, 3a,76,a5,27,bb,f 2,da ,88,58,ce,58,e9,05,6b,0b,82,\
 c3,74,ab,42,0d,fb,ee,c3,ea,57, d0,9d,67,a5,3d,6e,42 ,0d,60,c0,1a,70,24,46,16,\
 0a,0a,ce,0d,b8,27,4a,46,53,f3, 17
 2. Save the file with the .reg extension.
 3. If you run the file means it will ask you the confirmation to add the value to your Registry.
 4. Press Yes.
 5. Reboot your System.
 6. Start Downloading from Microsoft Site.

 ----------------------------------------------------------
 Disabling Balloon Tips:

 1. Start Regedit
 2. Go to HKEY_CURRENT_USER\Software\Mic rosoft\Windows\Curre ntVersion\Explorer\Advanced\
 3. Create a DWORD value of EnableBalloonTips
 4. Give it a value of 0


 TO INCREASE INTERNET BANDWIDTH...

 just Click Start then Run and type "gpedit.msc" without quotes.
 This opens the group policy editor. Then go to:
 Local Computer Policy
 then Computer Configuration
 then Administrative Templates then Network then QOS Packet Scheduler
 and then to Limit Reservable Bandwidth.
 Double click on Limit Reservable bandwidth. It will say it is not configured,
 but the truth is under the 'Explain' tab i.e."By default, the Packet
 Scheduler limits the system to 20 percent of the bandwidth of a
 connection, but you can use this setting to override the default."
 So the trick is to ENABLE reservable bandwidth, then set it to ZERO.
 This will allow the system to reserve nothing, rather than the default 20%......